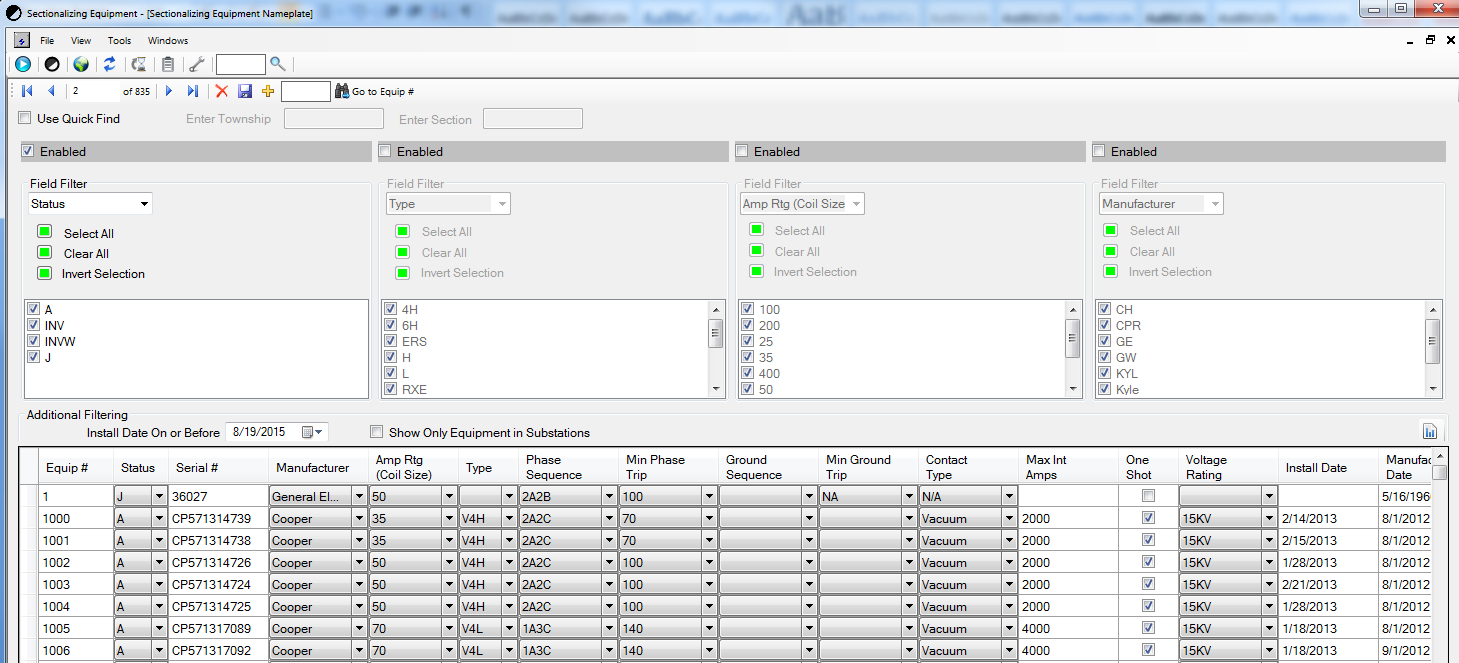
Nameplate
The Nameplate screen is for adding, changing, or deleting devices from the database. From this screen you can manage all of the physical data associated with a device.
Device Data Note
Except for device Status and Bank, these are considered to be a function of application. It can only be changed in the Change Out screen when moving equipment. They are displayed here because they are relevant. See Change Out for more information on how to change device Status and Bank.
For the tutorials on managing records see:
How to Navigate Nameplate Window
For an explanation of the tabs, search tools, and filtering see: Navigating LYNX
Default Layout of the Nameplate Window
- Viewing Records - Use for sorting Devices in the database.
Fields - Use this for an explanation of the fields and what data is contained there.
Fields Note
Much of the information on the devices is linked to the device type and other settings. For example any H, 4H, or L type reclosers the Minimum trip value is always twice the Amperage rating. If unsure of a field many times it can be looked up by just knowing the Type and Coil Size.
Equip # - (Equipment Number) Unique Cooperative number assigned to each device.
- Status - Identifier that calls out the state of the Equipment, 4 options. (One of two fields that can't be changed from this window, see Change Out to edit status).
- A - Active, equipment is currently installed and operating in the field.
- INV - Inventory, equipment is operable but not installed.
- INVW - Inventory Awaiting Overhaul, Equipment is NOT installed and is awaiting service.
- J - Junk, Equipment is deemed not fit for service and is to be disposed of (inventory management varies between Co-ops check status interpretations before assigning).
- Serial # - Unique identifier associate with individual equipment that is assigned by manufacturer.
- Amp Rtg (Coil Size) - (Amperage Rating) The continuous current rating of the device, the amount of current that it can take for an extended period without damage.
- Type - Recloser/Sectionalizer type, this is an industry standard identifier that informs on the specifications of the device.
- Phase Sequence - Calls out the trip pattern for the device–Ex. 1A3C would be 1 A (fast curve) trip followed by 3 C (slow curve) trips then lockout.
- Min Phase Trip - Calls out the minimum amperage on at least one phase that the device will trip after seeing.
- Ground Sequence - Calls out the trip pattern for the devices ground operation–This only applies to electronically controlled devices.
- Min Ground Trip - Calls out the minimum calculated ground current that the device will trip after seeing, only applies to electronically controlled reclosers.
- Contact Type - Identifies the type of Arc breaking used inside the device, Vacuum or Oil type.
- Max Int Amps - (Maximum Interrupting Amperage) The maximum fault current that the device can experience for a short time that the manufacturer certifies the equipment to successfully operate under.
- One Shot - Checkbox that identifies if the device has a built in One Shot setting, checked is Yes.
- Voltage Rating - The voltage class the device is certified to operate under, in kilovolts.
- Install Date - Date that the device was installed in its current location.
- Manufacture Date - Date the device was born on, stamped by the manufacturer.
- Panel # - The Cooperatives panel ID number.
- Panel Manufacturer - Brand of panel.
- Panel Model - Manufacturer model series.
- Panel Manfr Date - (Panel Manufacture Date) Date that the Panel was born on, stamped by manufacturer.
- Bank - The unique identifier assigned to each Bank in the field. A Bank can have multiple devices contained within it. (One of two fields that can't be changed from this window, see Change Out to edit status).
Phase Connected - The phase that the device is installed on — 1=A 2=B 3=C 4=AB 5=AC 6=BC 7=ABC
Phase Note
This phase code is the device phase code, NOT the bank phase code. A Bank can have devices on two/three phases (Ex. ABC) with two/three single-phase devices, or it can have one two/three-phase device. So if looking for information on device/s in a location be aware of that distinction. To add or remove devices on a bank see Change Out.
Cost - Purchasing cost of the device.
Comment - Any relevant information on the equipment.
Moving Between Records - Explanation of navigation toolbar on the Nameplate screen.
On the Nameplate (and Banks) window there is a toolbar for moving between records. It is located directly under the LYNX window buttons here:
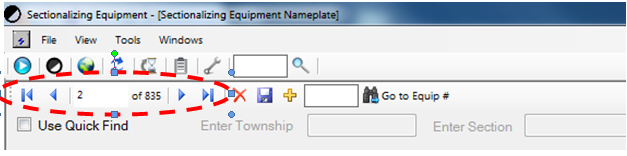
Using these buttons you can navigate the currently displayed devices (remember to use the filtering to control the currently displayed records).
- The outer buttons will jump to beginning or end.
- The inner buttons will move up or down one device.
- You can enter a specific number to jump to that device in the database (that devices current location on the screen not Co-op number).
Records Management Note
If you want to edit, add, or delete devices see:
STAR Energy Services LLC